Getting Started
Ananda is a studio management platform built for yoga, pilates, dance, and wellness studios. It handles everything you need to run your business: scheduling classes, taking bookings, collecting payments, managing your team, and communicating with students — all from one place.
Whether you are a solo teacher running a handful of weekly classes or a multi-location studio with a full teaching team, Ananda scales to fit your workflow. This guide walks you through every feature so you can get the most out of the platform.
How Ananda is organized
When you log into your studio dashboard you will see a navigation sidebar with these main areas:
- ▸ Dashboard — an at-a-glance overview of today's classes, pending payments, recent activity, and key metrics.
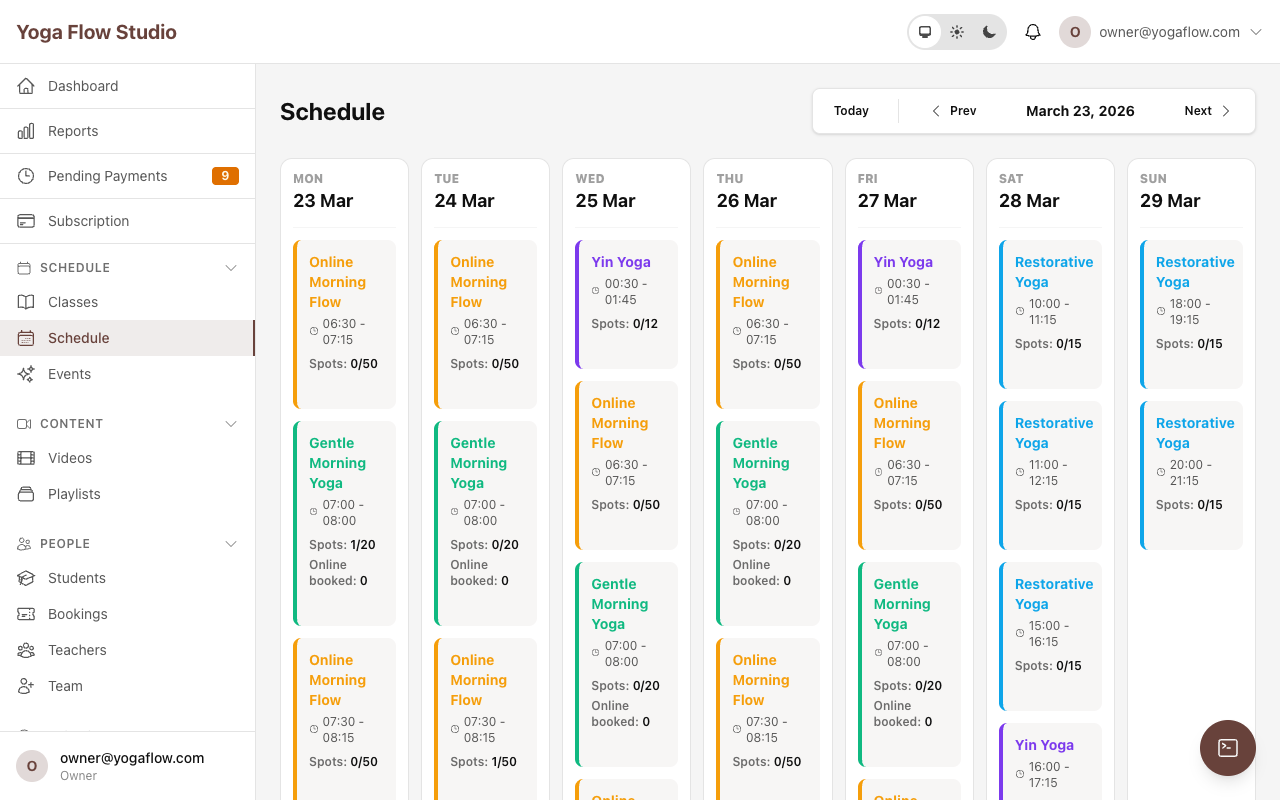
- ▸ Schedule — your weekly calendar showing all class occurrences and events. This is where you manage your timetable day to day.
- ▸ Classes — manage your class definitions (templates), recurring series, and individual occurrences.
- ▸ Pricing — create and manage drop-in rates, class passes, memberships, trial offers, and products.
- ▸ Students — your client database with profiles, booking history, active packages, and contact details.
- ▸ Settings — studio profile, locations, payment methods, integrations, team management, and account preferences.
First steps — getting your studio online
Follow these steps in order to go from a brand-new account to a fully bookable studio. Each step links to the relevant section of this guide for more detail.
-
1
Complete your studio profile
— go to Settings → Studio Profile. Upload a logo and cover image, write an about text, and add your contact details. This is the public face of your studio at
yourstudio.anandastudio.app. Students will see this page before they book their first class, so make it count. See Studio Setup → - 2 Set your timezone and currency — go to Settings → General. Choose your studio's timezone and display currency. All class times are stored in UTC and converted to your timezone for display, so set this correctly before scheduling classes.
- 3 Add your location — go to Settings → Locations and add the physical address where you teach. If you teach at multiple venues, add them all — you will assign a location to each class later. For online-only studios, you can skip this step. See Locations →
- 4 Create your first class definition — go to Classes → New Class. A class definition is the template (e.g. "Morning Vinyasa"). Fill in the title, duration, capacity, teacher, format, and booking rules. You only create this once — then you schedule occurrences from it. See Classes →
- 5 Schedule your first occurrence or create a recurring series — after creating the class definition, click Save & Schedule to add a single occurrence, or go to the class's Series tab and click New Series to generate an entire weekly timetable automatically. See Recurring Series →
- 6 Set up payments — go to Settings → Payment Methods and connect at least one payment provider. Stripe (card payments) is available on all plans. PayPal, bank transfer, and pay-in-studio are available from the Grow plan. See Payment Methods →
- 7 Create pricing options — go to Pricing and set up how students can pay — a drop-in rate, a class pass (e.g. 10-class pack), or a recurring membership. You need at least one active pricing option before students can book. See Packages & Pricing →
-
8
Share your studio link
— your public studio URL is
yourstudio.anandastudio.app. Send it to students by email, add it to your Instagram bio, or embed it on your website. Students can register, browse the schedule, purchase packages, and book classes — all from this link.
Setup checklist
When you first open your studio, Ananda shows a guided onboarding flow on your dashboard. It walks you through each step — choosing a plan, setting your language and timezone, adding a location, creating your first class, importing students, and connecting payments. Follow the checklist to get your studio live in minutes.
Key concepts to understand
Before diving in, it helps to understand a few core concepts that Ananda uses throughout the platform:
| Concept | What it means |
|---|---|
| Class Definition | The template for a class — its name, description, duration, capacity, and booking rules. Think of it as the recipe. |
| Class Occurrence | A specific scheduled date and time when a class runs. Think of it as one serving of the recipe. This is what students actually book. |
| Class Series | A recurring schedule that automatically generates occurrences — e.g. every Monday at 9:00 AM. Saves you from scheduling each class one by one. |
| Pricing Option | A package students can purchase — a drop-in, class pass, membership, trial, donation, or product. |
| Student Pricing Option | A specific instance of a pricing option owned by a student — their active class pass with remaining credits, or their active membership subscription. |
| Booking | A student's reservation for a specific class occurrence. Has a status: confirmed, attended, cancelled, or no-show. |
Frequently asked questions
Can I use Ananda for free? ▾
How do students find my studio? ▾
Do students need to create an account? ▾
Can I import existing students? ▾
Studio Setup
Before you start scheduling classes, take a few minutes to configure your studio's public presence and key settings. Everything in this section is accessible from the Settings menu in your studio dashboard.
Studio profile
Your studio profile is the public page that students see when they visit your studio URL. It displays your logo, cover image, about text, locations, upcoming classes, teachers, and your pricing options. Think of it as your studio's homepage.
To edit it, go to Settings → Studio Profile. Here is what you can configure:
- ▸ Studio logo — displayed in the navigation bar, emails, and the public schedule. Use a square image (at least 200 x 200 px) for best results.
- ▸ Cover image — a wide banner image shown at the top of your public studio page. Use a landscape image (recommended: 1200 x 400 px or larger).
- ▸ About text — a description of your studio, your teaching philosophy, and what students can expect. Markdown formatting is supported.
- ▸ First visit info — special instructions for first-time students (e.g. "Arrive 10 minutes early, bring your own mat"). This text is included in the booking confirmation email for new students.
- ▸ Contact details — email, phone number, and website URL. These are shown on your public profile page.
Locations
Add the physical addresses where you teach under Settings → Locations. Each location has:
- ▸ Name — a short label (e.g. "Main Studio", "Community Center").
- ▸ Full address — street, city, state/province, postal code, and country.
You can have as many locations as you need. When you create a class definition, you assign it to a location. Students see the location name and address on the schedule and in their booking confirmation.
If you only teach online, you do not need to create any locations. Simply set the class format to "Online" when creating your class definitions.
Timezone, currency, and language
Configure these under Settings → General:
- ▸ Timezone — all class times are stored internally in UTC and converted to your studio's timezone when displayed to you and your students. Set this correctly before scheduling your first classes. If you change it later, existing classes keep their original UTC times — they will just display differently.
- ▸ Currency — the currency used for all pricing, payments, and reports (e.g. EUR, USD, GBP). All pricing options and package prices are displayed and charged in this currency.
- ▸ Language — the default language for your studio interface and public pages. Currently Ananda supports English and Italian.
Terms & waivers
You can add your studio's liability waiver and terms of service under Settings → Legal. Students will see and must accept these terms before completing their first booking. This protects your studio legally and sets clear expectations.
You can write the waiver text directly in the editor (markdown is supported) or paste your existing document. The waiver is presented as a checkbox during checkout — the student must tick "I accept the terms" to proceed.
Frequently asked questions
Can I use my own custom domain? ▾
Can I change my studio slug (URL) later? ▾
What if I have multiple locations with different timezones? ▾
Classes
Classes are the heart of Ananda. This section covers everything from creating your first class definition to managing recurring series and handling edge cases like cancellations and substitutions.
Understanding class definitions vs. occurrences
Ananda separates the description of a class from the scheduled times it runs. This is the most important concept to understand:
Class Definition (the template)
Think of it like a recipe card. It describes what the class is — its name, description, duration, capacity, teacher, style, level, format, and booking rules. You create it once.
Example: "Morning Vinyasa" — 60 minutes, capacity 20, taught by Sarah, in-person at Main Studio.
Class Occurrence (the scheduled time)
Think of it like one serving of the recipe. It is a specific date and time when "Morning Vinyasa" actually runs. Monday March 10 at 9:00 AM is one occurrence. This is what students see on the schedule and what they book.
Example: "Morning Vinyasa" on Monday 10 March at 09:00 — 4 of 20 spots booked.
This separation means you only need to describe "Morning Vinyasa" once. You then schedule as many occurrences as you want — manually or via a recurring series — without re-entering all the details every time. If you later update the class definition (e.g. change the capacity from 20 to 25), the change automatically propagates to all future occurrences.
Creating a class definition — step by step
Go to Classes → New Class. The form is organized into sections:
Basic Information
- ▸ Title (required) — the name of the class as it appears on the schedule and public page. Be descriptive: "Morning Vinyasa" is better than "Yoga."
- ▸ Description — a longer text describing the class for students. Shown on the class detail page. Explain what to expect, who it is for, and what to bring.
- ▸ Type — Group, Private, or Workshop. See "Class types" below for details.
- ▸ Level — All Levels, Beginner, Intermediate, or Advanced. Helps students find classes that match their experience.
- ▸ Duration (minutes) (required) — how long the class lasts, in minutes. Defaults to 60. When you schedule an occurrence, the end time is calculated automatically from the start time plus this duration.
- ▸ Capacity — the maximum number of in-person students. Leave empty for unlimited. When capacity is reached, new students are added to the waitlist (Grow plan) or see a "Class full" message.
- ▸ Location — the physical venue for this class. Choose from your pre-configured locations, or leave blank for online-only classes.
- ▸ Default Teacher — the teacher who normally leads this class. You can override the teacher on individual occurrences or series (e.g. for substitute teachers).
- ▸ Calendar Color — a color for the class on the schedule view. Helps visually distinguish different class types at a glance.
Class Format
Choose how the class is delivered:
- ▸ In-person — students attend physically at your studio or location.
- ▸ Online — students attend via video. If you have connected Zoom (under Settings → Integrations), a meeting is created automatically for each occurrence. Otherwise, you can enter a meeting URL manually on each occurrence. Students receive a protected join link in their confirmation email — each student gets a unique link that only works for their own booking, preventing link sharing.
- ▸ Hybrid — students choose in-person or online at booking time. Capacity limits apply only to in-person spots — online participants do not count against the capacity, so you can have unlimited online attendees. This is ideal if you stream your in-person class live.
Visibility
Control who can see and book a class on your public schedule:
- ▸ Everyone — visible to all visitors, including people who have not registered yet. Use this for all your regular public classes.
- ▸ Existing clients — only visible to students who have an account at your studio. New visitors browsing your schedule will not see these classes. Useful for advanced-level classes you only want existing students to find.
- ▸ Members only — only visible to students with an active membership (a package with more than one class credit). Use this for exclusive member-only classes.
Booking Settings
- ▸ Booking window (days) — how many days in advance students can book. Default is 60 days. For example, if set to 14, students can book up to two weeks ahead but no further. Set this shorter if you do not want students locking in spots months in advance.
- ▸ Booking cutoff (minutes) — how many minutes before the class start time online bookings close. Default is 15 minutes. A value of 60 means bookings close one hour before class. Set this to 0 to allow bookings right up until class starts.
- ▸ Minimum attendees — if set, Ananda sends a warning email to all studio admins 24 hours before any occurrence that has fewer bookings than this threshold. This gives you time to promote the class or decide to cancel it.
- ▸ Show available spots — when enabled, students see a "X spots left" indicator on the schedule. Disable if you prefer not to show availability publicly.
Drop-in Pricing & Refund Policy
- ▸ Allow drop-ins — when enabled, students without a class pass or membership can pay a one-off fee to attend just that class. Disable if this class is only available through packages.
- ▸ Drop-in price — the price for a single drop-in attendance. Only applies when drop-ins are enabled.
- ▸ Refund window (hours) — how many hours before class a cancellation qualifies for a refund. Default is 24 hours. If a student cancels within this window, they receive the refund percentage configured below.
- ▸ Refund percentage — the percentage of the booking cost to refund when cancelled within the refund window. Default is 100%. Set to 50% for a partial refund, or 0% for no refund.
- ▸ Cancellation window (hours) — how many hours before class a student can cancel their booking. After this deadline, students cannot cancel on their own — only an admin can cancel. Use this to prevent last-minute cancellations.
Private Content
You can add private content to a class definition — notes, links, preparation instructions, or video links that are only visible to students who have booked that class. Use this to share class materials, playlists, or specific instructions with enrolled students.
Class types
When creating a class definition, choose one of three types:
| Type | Best for | Capacity | Plan required |
|---|---|---|---|
| Group | Regular classes open to all students — yoga, pilates, dance, etc. | Usually 10–30+ | All plans |
| Private | One-on-one or small-group private sessions with individual attention | Usually 1–5 | Grow and above |
| Workshop | Intensive or specialty sessions — masterclasses, intensives, teacher trainings | Varies | Grow and above |
Scheduling individual occurrences
Once you have a class definition, you can schedule individual occurrences. Go to Classes, click on the class, then click Schedule Occurrence. You will be asked for:
- ▸ Date — the date the class will take place.
- ▸ Time — the start time, in your studio's timezone. The end time is calculated from the class definition's duration.
- ▸ Online meeting URL — for online or hybrid classes without Zoom connected, enter the meeting link here. If Zoom is connected, this is filled automatically.
Once saved, the occurrence appears on your schedule and is immediately bookable by students (within the booking window you configured).
Recurring series — automate your timetable
Instead of scheduling each class one by one, use a recurring series to generate many occurrences at once. This is how most studios build their weekly timetable.
Go to Classes, click on the class definition, then go to the Series tab and click New Series. Configure:
- ▸ Day of the week — which day the class runs (e.g. Monday, Wednesday).
- ▸ Start time — the time the class starts, in your studio's timezone.
- ▸ Start date — the first date for this series.
- ▸ Teacher override — optionally assign a different teacher than the class definition's default. Useful if the same class has different teachers on different days (e.g. Monday is Sarah, Wednesday is Tom).
- ▸ Series type — determines how long the series runs. Three options:
Infinite
The series runs indefinitely with no end date. Ananda automatically generates occurrences three months into the future and refreshes this window continuously via a background job. Use this for your permanent weekly timetable — you never need to touch it again.
Fixed (end date)
The series runs from the start date until a specific end date you choose. Use this for term-based schedules (e.g. "Fall term: September 1 to December 15").
Block (fixed number of classes)
The series runs for a fixed number of weekly classes (e.g. an 8-week beginner course). You specify the count, and Ananda generates exactly that many weekly occurrences from the start date.
When you save a series, Ananda immediately generates all the occurrences. They appear on your schedule and are immediately bookable.
Editing individual occurrences
Every occurrence can be edited independently without affecting the series or other occurrences. Open an occurrence from the schedule and you can change:
- ▸ Date and time — move the class to a different slot.
- ▸ Duration — override the default duration for this one class.
- ▸ Capacity — increase or decrease the capacity for this one class.
- ▸ Teacher — assign a substitute teacher for this one class.
- ▸ Online meeting URL — update or add the video link for this occurrence.
If you change the date/time or teacher of an occurrence that has existing bookings, Ananda automatically sends an update notification email to all booked students.
How changes propagate
Changes to a class definition or series can automatically propagate to future occurrences. Here is how it works:
| What you change | Effect on future occurrences | Effect on past occurrences |
|---|---|---|
| Class definition capacity | Updated automatically on all future occurrences | No change |
| Class definition duration | End times recalculated for all future occurrences | No change |
| Series teacher | Updated on all future occurrences in that series | No change |
| Class definition title, description, level, etc. | Displayed automatically (occurrences inherit from the definition) | Also reflected (they link to the same definition) |
Cancelling a single class
If you need to cancel a single class occurrence (e.g. teacher is sick, holiday), open the occurrence from the schedule and click Cancel Class. Here is what happens:
- 1 The occurrence status changes to "cancelled."
- 2 All existing bookings for that occurrence are cancelled automatically.
- 3 Every booked student receives a cancellation email notifying them the class has been cancelled.
- 4 Class credits are returned to any student who paid with a class pass.
- 5 If Zoom was connected, the Zoom meeting is deleted.
Cancelling an occurrence does not affect the series — the next week's class will still be generated as normal. This is how you cancel a single class without affecting the series.
Deleting an occurrence vs. cancelling
You can also delete an occurrence. The difference:
- ▸ Cancel — the occurrence stays on the schedule with a "cancelled" badge. Students can see it was cancelled. Use this when you want to communicate that the class was planned but is no longer happening.
- ▸ Delete — the occurrence is removed from the schedule entirely (soft-deleted). If it had bookings, they are cancelled first with the same process as a cancellation. Use this to remove occurrences that were created by mistake.
Archiving a class definition
If you permanently stop offering a class, you can archive its definition. Go to Classes, find the class, and click Archive.
- ▸ Archived definitions no longer appear in your class list or on the public schedule.
- ▸ Existing future occurrences from archived definitions are filtered out of the schedule view.
- ▸ Historical data (past occurrences, bookings, attendance) is preserved for reporting.
Archiving is different from deleting — it is a soft removal that preserves all history. Use archiving for classes you are retiring. Only delete a class definition if it was created by mistake and has no bookings.
Frequently asked questions
What happens if I change the class definition after classes are already scheduled? ▾
How do I cancel a single class without affecting the series? ▾
What is the difference between archiving and deleting a class? ▾
Can I assign different teachers to different days of the same class? ▾
How far ahead does Ananda schedule infinite series? ▾
How does capacity work for hybrid classes? ▾
Are booked students notified when I change a class time or teacher? ▾
Events & Workshops
Events are one-off special occasions — retreats, intensives, workshops, masterclasses, teacher trainings, and more. They work differently from regular classes: events have their own dedicated booking page, support multiple ticket types with different pricing, and do not recur.
When to use an event vs. a class
Use a class for anything that runs on a recurring schedule — weekly yoga, daily pilates, etc. Use an event for one-off occasions with special pricing.
| Classes | Events | |
|---|---|---|
| Recurrence | Recurring series supported | One-off only |
| Pricing | Paid via class pass, membership, or drop-in | Multiple ticket types (e.g. Early Bird, Standard, VIP) |
| Usable with class pass | Yes | No — tickets only |
| Booking page | Shown on the studio schedule | Dedicated event page with its own URL |
| Status workflow | scheduled / cancelled / completed | draft / published / cancelled / completed |
Creating an event — step by step
Go to Schedule → Events → New Event. Fill in the following:
- ▸ Title — the event name (e.g. "Weekend Yoga Retreat", "Inversions Workshop").
- ▸ Description — a detailed description shown on the public event page. Explain the agenda, what to bring, who it is for, and any prerequisites.
- ▸ Cover image — a visual banner for the event page. A compelling image increases ticket sales.
- ▸ Start and end time — when the event begins and ends. Unlike classes (which calculate end time from duration), events have an explicit end time. Both are displayed to students.
- ▸ Location — where the event takes place. Choose from your saved locations.
- ▸ Capacity — the overall maximum number of attendees. Leave empty for unlimited. Note: individual ticket types can also have their own quantity limits.
-
▸
Ticket types
— create one or more ticket tiers. Each ticket type has a name, a price, and an optional quantity limit. For example:
- Early Bird — EUR 35 — limited to 20 tickets
- Standard — EUR 50 — unlimited
- VIP (with lunch) — EUR 80 — limited to 10 tickets
Event statuses
Events follow a lifecycle:
- ▸ Draft — the event is being set up. It is not visible on your public page and cannot be booked.
- ▸ Published — the event is live. Students can see it on your events page and purchase tickets. This is the default status when you create an event.
- ▸ Cancelled — the event has been cancelled. You can cancel an event from the event management page.
- ▸ Completed — the event has taken place.
Managing event attendees
Once tickets are sold, you can view all attendees from the event detail page in your dashboard. The attendee list shows each booking with the ticket type, student name, payment status, and booking date. You can also cancel individual event bookings from this view.
Frequently asked questions
Can students use a class pass to attend an event? ▾
Can I create a free event? ▾
Can I have a waitlist for events? ▾
Managing Bookings
A booking is a student's reservation for a specific class occurrence. This section covers the entire booking lifecycle — from how students book, to how you manage bookings from the admin side, to cancellations and refunds.
How students book a class
Here is the student booking flow, step by step:
- 1 The student visits your studio URL and browses the public schedule.
- 2 They click on a class to see its details — description, teacher, location, time, and available spots.
- 3 They click "Book" (or "Join Waitlist" if the class is full).
-
4
Payment resolution:
Ananda checks the student's active packages in priority order:
- If they have an active class pass or membership with remaining credits, one credit is deducted automatically.
- If they have a pending package (bank transfer or pay-in-studio not yet confirmed), Ananda allows up to 3 advance bookings against that package.
- If they have no package but drop-ins are enabled, they can pay the drop-in price.
- If none of the above apply, they are prompted to purchase a package first.
- 5 For hybrid classes, the student chooses between in-person and online attendance.
- 6 The booking is confirmed and the student receives a confirmation email with class details, location, teacher name, and — for online classes — a protected join link unique to their booking.
Booking on behalf of a student (admin booking)
From your studio dashboard, you can book any class for any student. This is useful for walk-in students, phone bookings, or when you need to override booking rules.
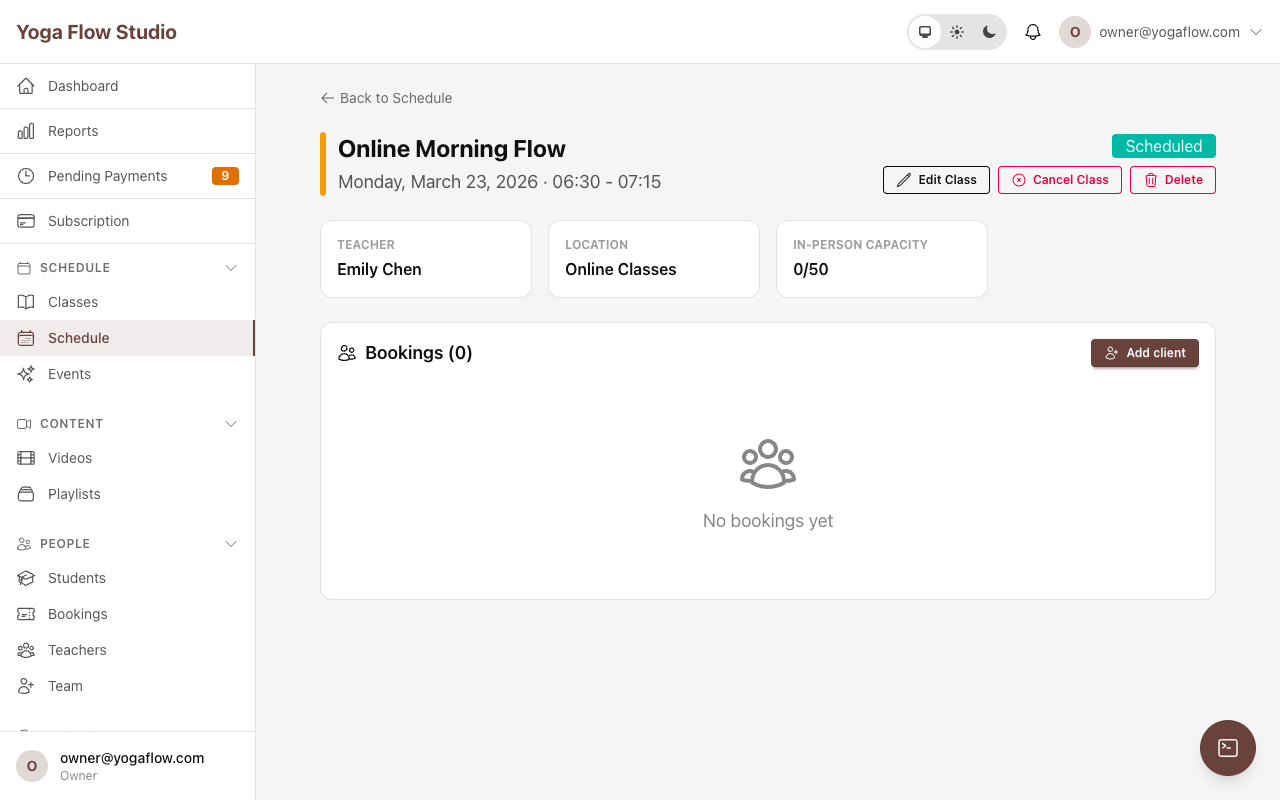
How to: Go to Schedule, click on a class occurrence to open the detail modal or page, and click Add Client. Search for the student by name or email, then choose the payment method:
- ▸ Package — deduct a credit from one of the student's active passes. You choose which pass to use.
- ▸ No charge — book the student for free without deducting a credit. Useful for complimentary classes, trial sessions, or make-up classes.
Admin bookings bypass the booking window and cutoff restrictions. The student receives the same confirmation email as a self-booked class. For hybrid classes, you can select the participation mode (in-person or online) when adding the client.
Booking statuses
Every booking goes through a lifecycle:
| Status | Meaning |
|---|---|
| Confirmed | The student has a valid booking and is expected to attend. |
| Attended | The student was checked in by staff (or via "Check In All"). |
| No-show | The student was booked but did not attend. Marked by staff. |
| Cancelled | The booking was cancelled — by the student, by an admin, or because the class was cancelled. |
Cancelling a booking
Bookings can be cancelled in two ways:
- ▸ By the student — from their account page, within the cancellation window you configured on the class definition. If the cancellation window has passed, the student cannot cancel on their own.
- ▸ By an admin — from the studio dashboard, at any time, regardless of the cancellation window.
What happens when a booking is cancelled:
- The booking status changes to "cancelled."
- If the student paid with a class pass, the credit is returned to their pass.
- The in-person spot is released (spots_taken is decremented).
- If there is a waitlist, the next person in line is automatically promoted to a confirmed booking and notified by email.
- The student receives a cancellation email.
Refund policy
Refunds are calculated automatically based on the class definition's refund policy settings:
- ▸ If the student cancels within the refund window (e.g. more than 24 hours before class), they receive the configured refund percentage (e.g. 100%).
- ▸ If they cancel outside the refund window (e.g. less than 24 hours before class), the refund percentage is 0%.
- ▸ For pass-based bookings, the refund means the credit is returned to their pass. For drop-in payments, it means a monetary refund.
You configure refund policy per class definition under the "Drop-in Pricing & Refund Policy" section. See Classes → Refund Policy
Cancelling an entire class
If you need to cancel a class occurrence entirely (not just one student), see the Classes → Cancelling a single class section. All bookings are cancelled automatically, credits are returned, and students are notified.
Frequently asked questions
What happens if a student tries to book a class they are already booked for? ▾
What happens when a student's pass does not cover this class? ▾
Can I overbook a class as an admin? ▾
What is a "pending payment" booking? ▾
Do online participants take up capacity? ▾
Waitlist
The waitlist ensures no spot goes to waste. When a class is full, students can join a waitlist instead of being turned away. If someone cancels, the next person on the waitlist is automatically promoted to a confirmed booking.
How the waitlist works
- 1 A student tries to book a full class. Instead of seeing a dead end, they see a "Join Waitlist" button.
- 2 They click it and are added to the waitlist in order. Each entry has a position number (1st, 2nd, 3rd, etc.).
- 3 When a confirmed booking is cancelled and an in-person spot opens up, Ananda automatically promotes the first person on the waitlist.
- 4 The promoted student's booking is created immediately. If they have an active pass with remaining credits, one credit is deducted automatically.
- 5 The promoted student receives a booking confirmation email.
- 6 If the promoted student does not have a valid pass, they receive a separate email asking them to purchase a package or pay the drop-in price before the class starts.
Leaving the waitlist
Students can leave the waitlist at any time from their account page. When they leave, their entry is marked as cancelled and the next person in line moves up in priority.
Viewing the waitlist as an admin
From the occurrence detail view in your dashboard, you can see how many students are on the waitlist for any class. The waitlist is managed automatically — you do not need to manually promote students.
Frequently asked questions
Is the student charged when they join the waitlist? ▾
What if the promoted student no longer has an active pass? ▾
Is there a limit to how many people can be on the waitlist? ▾
Does the waitlist work for online participants in hybrid classes? ▾
Check-in
Check-in is how you record attendance. When students arrive for class, you mark them as attended. This data powers your attendance reports, attendance probability predictions, no-show tracking, and student milestone emails.
Where to access check-in
There are two places to check in students:
- ▸ Schedule modal — click any class occurrence on the Schedule page to open the quick-view modal. It shows the participant list with check-in buttons next to each name. Fast and convenient for quick check-ins.
-
▸
Occurrence detail page
— click "Open Detail" on any schedule card to go to the full occurrence page at
/studio/schedule/occurrences/:id. This page shows all bookings split into active and cancelled sections, with timestamps, participation mode icons (in-person or online), attendance probability dots, and individual check-in controls.
Checking in individual students
On the participant list, each confirmed booking has a check-in button. Click it to mark the student as attended. Here is what happens behind the scenes:
- 1 The booking status changes from "confirmed" to "attended" and the check-in timestamp is recorded.
- 2 A feedback request email is queued — asking the student to rate the class and teacher.
- 3 If this check-in brings the student's total attended classes to a milestone (10, 25, 50, or 100), a congratulatory milestone email is sent.
Check In All — bulk check-in
When there are confirmed bookings, a Check In All button appears at the top of the participant list. Click it to check in every confirmed student at once. A confirmation dialog prevents accidental bulk check-ins.
This is useful at the start of a packed class — check everyone in with one click, then mark individual no-shows afterward. The button disappears once all students have been checked in.
Marking no-shows
If a student was booked but did not attend, you can mark them as a no-show. Click the no-show button next to their name in the participant list.
When you mark a student as no-show:
- ▸ Their booking status changes to "no_show."
- ▸ They receive a follow-up email acknowledging they missed the class.
- ▸ The no-show is recorded on their student profile and counts in attendance reports.
- ▸ Their attendance probability score is updated — frequent no-shows lower the score.
Attendance probability
Next to each participant's name in the check-in view, you will see a small color-coded dot indicating their attendance probability — a prediction based on their historical booking outcomes.
- ▸ How it is calculated: the formula considers attended classes (weighted 1.0), cancelled bookings (weighted 0.5), and no-shows (weighted 0.1). The result is a score from 0.0 to 1.0. Students with fewer than 3 resolved bookings do not get a score.
- ▸ Color coding: hover over the dot to see the exact percentage. Green means high probability of attending, yellow means moderate, red means the student frequently misses class.
- ▸ Why it matters: at a glance, you can anticipate no-shows before class starts. If you see several red dots, you might expect a few open spots and can plan accordingly — or even reach out to waitlisted students proactively.
Who can check in students
Staff members with the "Check in students" permission can access the check-in screen. This permission is granted to all roles by default (owners, admins, and teachers). You can configure staff permissions under Settings → Staff .
Student milestone emails
Ananda automatically celebrates student loyalty. When a check-in brings a student's total attended classes to a milestone — 10, 25, 50, or 100 — they receive a congratulatory email. This is a nice touch that reinforces engagement and makes students feel valued.
Frequently asked questions
Can I undo a check-in? ▾
Can teachers check in their own students? ▾
Does checking in a student trigger any other actions? ▾
How accurate is the attendance probability? ▾
Packages & Pricing Options
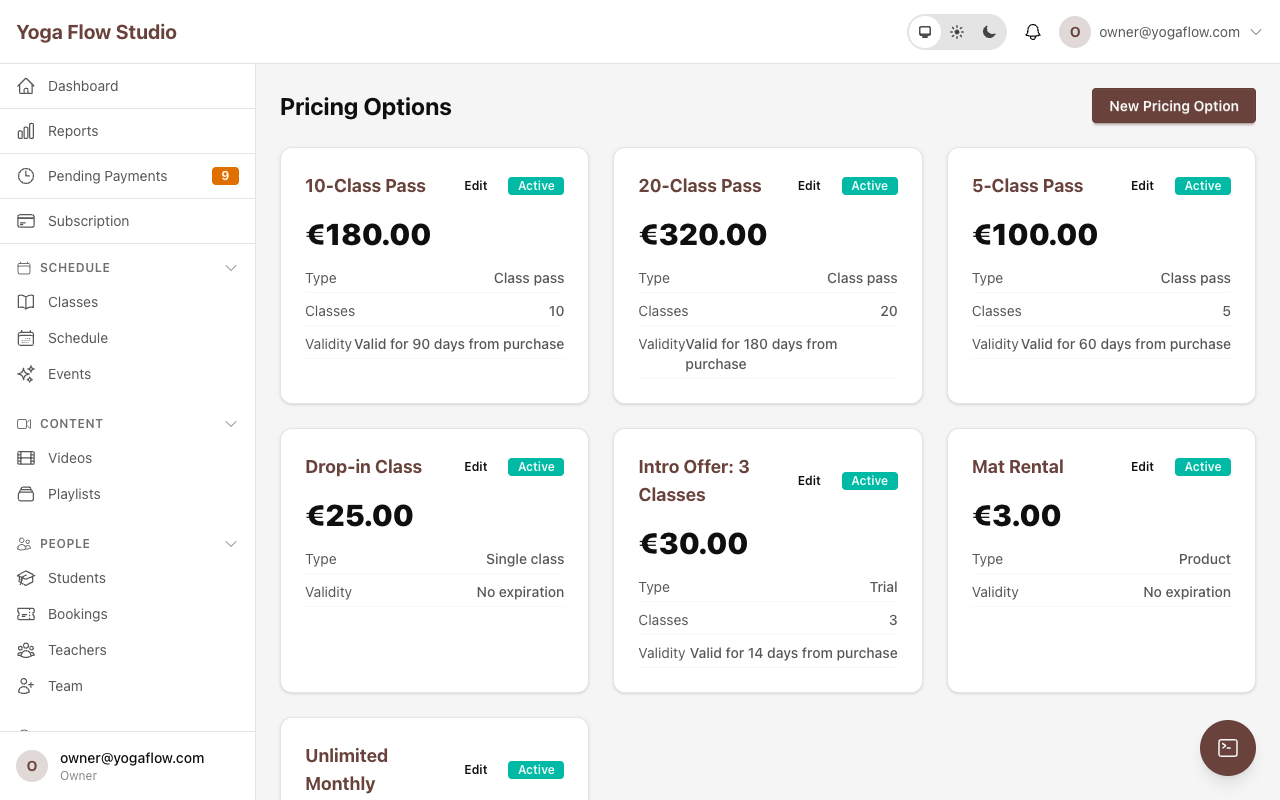
Pricing options define how students pay for classes at your studio. Go to Pricing in your studio dashboard to create and manage them. You need at least one active pricing option before students can book classes.
Ananda supports six pricing types, each designed for a different business model. You can mix and match as many as you like — most studios offer a drop-in rate, one or two class passes, and a membership.
Fields shared by all pricing types
Every pricing option — regardless of type — has these core fields:
- ▸ Name (required) — the label students see at checkout. Be clear and specific: "10-Class Yoga Pass" is better than "Pass A."
- ▸ Pricing type (required) — one of: Single Class, Class Pass, Membership, Trial, Donation, or Product. This cannot be changed after creation.
- ▸ Price (required) — the amount charged in your studio's currency. Stored internally in cents for precision. For Donation types the student chooses their own amount, but you still set a suggested minimum.
- ▸ Active toggle — only active pricing options appear on your public page. Deactivate a package to stop new sales without deleting it — students who already purchased it keep their existing credits.
Single class (drop-in)
A one-off payment to attend a single class. The student pays and is booked into that specific class occurrence. No credit to use later — it is pay-per-class.
How it works: When a student books a class and selects a single-class pricing option, they pay immediately and receive one booking. The pricing option has a class limit of 1 and no validity period — it is consumed instantly.
Best for: Occasional students who do not want to commit to a pass or membership. Also useful as a fallback option so every student always has a way to book.
Class pass
A bundle of a fixed number of classes. The student pays once and receives credits they can use to book classes over time. Each booking deducts one credit from the pass.
Fields specific to class passes:
- ▸ Number of classes (class limit) — how many credits the pass contains (e.g. 5, 10, 20). Each booking uses one credit. When all credits are used, the pass status changes to "expired."
- ▸ Validity — how long credits last after purchase. See the "Validity options" section below.
- ▸ Class eligibility — optionally restrict the pass to specific class definitions. Leave empty to allow the pass for any class. See "Package restrictions" below.
Best for: Regular students who attend several times per month. Offer a per-class discount compared to drop-in pricing to reward commitment.
Membership (recurring)
A recurring subscription that charges the student automatically on a regular schedule. Memberships are processed by Stripe and renew automatically until cancelled by the student or by your studio.
Fields specific to memberships:
- ▸ Billing interval — how often the student is charged: weekly, monthly, quarterly, or yearly. Choose the cadence that matches your pricing structure.
- ▸ Classes per period (class limit) — how many classes the student can book per billing period. Leave blank for unlimited classes. Credits reset at the start of each billing cycle.
- ▸ Minimum commitment cycles — require a minimum number of billing cycles before the student can cancel. For example, set this to 3 on a monthly membership to enforce a 3-month minimum term. Leave blank for no minimum — the student can cancel at any time.
- ▸ Class eligibility — restrict to specific class types if needed. See "Package restrictions" below.
- ▸ Stripe price ID — created automatically when you save the membership. Ananda creates a Stripe Price object linked to your connected Stripe account. You do not need to configure this manually.
Best for: Committed students who attend regularly. Gives them peace of mind with automatic renewal, and gives you predictable recurring revenue.
Trial offer
An introductory package for new students — typically a discounted first class or a short bundle at a special price.
Trial offers are automatically restricted to first-time clients only: any student who has previously purchased any package at your studio will be blocked from buying a trial. This is enforced at checkout and prevents returning students from exploiting welcome discounts.
Like class passes, trials support a class limit and validity period. A common setup is a "First Class Free" trial with a price of 0 and a class limit of 1.
Best for: Attracting new students by lowering the barrier to try your studio for the first time.
Donation
A pay-what-you-can option. The student chooses their own amount when purchasing. The price you set on the pricing option acts as a suggested minimum, but students can pay more.
Best for: Community classes, charity events, karma yoga sessions, or any class where you want to let students decide what to pay.
Product
A non-class item — mat rental, merchandise, workshop materials, teacher training deposits, etc. Products do not include class credits and cannot be used to book classes. They are simply a way to collect payment for physical or standalone items through your studio page.
Validity options
For class passes and trials, you control how long credits remain valid after purchase. Validity and fixed expiry are mutually exclusive — you can set one or the other, but not both.
| Option | How it works | Example |
|---|---|---|
| No expiry | Credits never expire. The student can use them at any time, even months later. | "10-Class Pass" with no time limit |
| Relative validity (days) | Credits expire a fixed number of days after the purchase date. The expiry is calculated per student, based on when they bought it. | "30-Day Pass" — expires 30 days after purchase |
| Fixed expiry date | All passes of this type expire on a specific calendar date, regardless of when purchased. Ideal for term-based passes. | "Spring Term Pass" — valid until June 30 |
Package restrictions
By default, a package grants access to all classes and video content at your studio. Under Package Restrictions in the pricing form, you can choose "Let me choose" to control exactly what the package includes.
-
▸
Scope (class format)
— limit the package to online classes only, in-person classes only, or all formats. Stored as the
scopefield with values: "all", "online_only", or "in_person_only". - ▸ Eligible class definitions — restrict the pass to specific class definitions by selecting them from a list. For example, a "Pilates 10-Pack" that only works for Pilates classes. When a student with this pass tries to book an ineligible class, they are prompted to use a different pass or purchase a new one.
- ▸ Included content types — choose which class categories the package covers: group classes, private sessions, workshops, and/or video playlists. When you check a category, the package includes all current and future classes of that type — so any new group class you create later is automatically included.
- ▸ Eligible playlists — restrict video on demand access to specific playlists, or include all playlists via the content types toggle.
How a purchased package works (lifecycle)
When a student purchases a pricing option, Ananda creates a Student Pricing Option — a personal instance of that package tied to the student. Here is the lifecycle:
- 1 Purchase — the student pays and the package is created with status "active" (or "pending_payment" for bank transfer / in-studio payments).
-
2
Active
— the student can book classes. Each booking decrements
classes_remainingby one and incrementsclasses_used. For unlimited passes, classes_remaining is null. - 3 Paused (optional) — you can pause a student's package from their profile. While paused, they cannot use it to book classes. Resume it at any time. Useful for injuries, travel, or medical leave.
- 4 Expired — the package has expired by date, or all credits have been used. The student must purchase a new package.
- 5 Cancelled — the package was cancelled by the student or by an admin. For memberships, cancellation stops future billing.
| Status | Can book? | Description |
|---|---|---|
| active | Yes | Package is valid and has remaining credits (or is unlimited) |
| pending_payment | No | Awaiting manual payment confirmation (bank transfer / in-studio) |
| paused | No | Temporarily frozen by admin — credits preserved |
| expired | No | Past the expiry date or all credits used |
| cancelled | No | Cancelled by student or admin |
Frequently asked questions
What happens when a pass expires? ▾
Can I change credits on an active pass? ▾
How does eligibility filtering work? ▾
Can a student have multiple active packages? ▾
What happens when a student cancels a booking — are credits returned? ▾
Payment Methods
Ananda supports six payment methods. You can enable and disable each one individually under Settings -> Payment Methods. Each method can be switched on or off at any time without affecting existing payments.
| Method | Plan required | Instant? | Confirmation |
|---|---|---|---|
| Stripe (card) | All plans | Yes | Automatic |
| PayPal | Grow and above | Yes | Automatic |
| Bank transfer | Grow and above | No | Manual by admin |
| Pay in studio (cash) | Grow and above | No | Manual by admin |
| Gift card | Grow and above | Yes | Automatic |
| Free | All plans | Yes | Automatic (no charge) |
Card payments (Stripe)
Students pay by credit or debit card through Stripe. Payments are processed instantly and settled to your bank account according to Stripe's standard payout schedule (typically 2-7 business days depending on your country).
Setup — step by step:
- 1 Go to Settings -> Payment Methods.
- 2 Click Connect Stripe.
- 3 You will be redirected to Stripe. Create a new Stripe account or connect an existing one. Follow the Stripe onboarding steps (business details, bank account for payouts).
- 4 Once complete, you are redirected back to Ananda. Card payments are enabled immediately.
Platform fee: Ananda deducts a small platform fee from each Stripe transaction. The fee percentage depends on your plan — higher plans have lower fees. This is in addition to Stripe's own processing fee (typically 1.4% + 0.25 EUR for European cards).
How it works technically:
Ananda uses Stripe Connect. When a student pays, a Stripe PaymentIntent is created. The payment goes directly to your Stripe account minus the platform fee. Ananda stores the
stripe_payment_intent_id on the payment record for reconciliation.
PayPal
Students pay using their PayPal account or a card through the PayPal checkout. Payments are processed instantly and deposited into your PayPal Business account.
Setup — step by step:
- 1 Go to Settings -> Payment Methods.
- 2 Click Connect PayPal.
- 3 You will be redirected to PayPal to authorise the connection. You need a PayPal Business account (personal accounts will not work).
- 4 Once authorised, PayPal appears as a payment option at checkout.
How it works technically:
Ananda creates a PayPal order and captures the payment. Both the
paypal_order_id and
paypal_capture_id are stored on the payment record.
Bank transfer
Students select "Bank transfer" at checkout and are shown your bank details (IBAN, BIC, beneficiary name, payment reference). The booking is created immediately but the payment is marked as pending until you manually confirm it.
Setup:
- 1 Go to Settings -> Payment Methods.
- 2 Enable Bank Transfer.
- 3 Enter your bank account details: beneficiary name, IBAN, BIC/SWIFT code.
- 4 Optionally add custom instructions that students will see at checkout (e.g. "Please use your full name as the payment reference").
Confirming payments: Pending payments appear on your dashboard under Pending Payments. Once you have received the bank transfer, open the pending payment and click Confirm. The student's package is activated and they can start booking.
Pay in studio
Students select "Pay in studio" at checkout, indicating they will pay in person (cash, card terminal, etc.). Like bank transfer, the payment is marked pending until you confirm it.
Setup: Go to Settings -> Payment Methods, enable Pay in Studio, and add your instructions (e.g. "Bring cash or card to reception before class").
Confirming: Same process as bank transfer — go to the pending payment on your dashboard and click Confirm once you have received the money in person.
Payment statuses
Every payment record has a status that tracks where it is in the lifecycle:
| Status | Meaning |
|---|---|
| pending | Payment initiated but not yet confirmed. For bank transfers and in-studio payments, waiting for admin confirmation. For Stripe/PayPal, waiting for processor response. |
| succeeded | Payment completed successfully. The student's package is active. |
| failed | Payment was declined or failed. The package is not activated. The student is notified and can try again. |
| refunded | Payment was refunded. For Stripe and PayPal, the refund is processed through the original payment provider. |
Refunds
Refunds for Stripe and PayPal payments can be issued from the student's payment history in their profile. For bank transfers and in-studio payments, refunds are handled manually outside Ananda (you transfer the money back directly). In all cases, the refund is recorded on the payment record for your bookkeeping.
Frequently asked questions
What fees does Stripe charge? ▾
Can I have both Stripe and PayPal enabled? ▾
What if a payment fails? ▾
How do I handle payments for free trial packages? ▾
Promo Codes & Gift Cards
Promo codes
Promo codes give students a discount at checkout. Go to Promotions -> Promo Codes to create and manage them.
Creating a promo code — field by field:
- ▸ Code (required) — the text the student enters at checkout (e.g. WELCOME20, SUMMER2026). Must be unique within your studio. Case-insensitive — "welcome20" and "WELCOME20" are treated as the same code.
-
▸
Discount type
(required)
— choose between:
- Percentage — a percentage off the total (e.g. 20% off). The discount value is the percentage.
- Fixed amount — a fixed amount off the total (e.g. 10 EUR off). The discount value is the amount in cents.
- ▸ Discount value (required) — the magnitude of the discount. For percentage type, enter the percentage (e.g. 20 for 20%). For fixed amount type, the amount is stored in cents.
- ▸ Valid from / Valid until — optionally set a start and end date for the code. Outside this window the code cannot be redeemed. Leave both blank for a code that is valid indefinitely (until you deactivate it).
-
▸
Maximum uses
— limit how many times the code can be redeemed in total across all students. Leave blank for unlimited uses. The current redemption count is tracked in the
times_usedfield. - ▸ Active toggle — enable or disable the code at any time. A deactivated code cannot be redeemed even if it is within its validity window.
Gift cards
Gift cards let someone purchase credit that another person can redeem at your studio. Go to Promotions -> Gift Cards to manage them.
Gift card fields:
- ▸ Code — a unique code automatically generated when the gift card is created. This is what the recipient enters at checkout.
- ▸ Amount — the original value of the gift card in your studio's currency.
- ▸ Remaining balance — the current balance, which decreases with each use. Tracked automatically.
- ▸ Recipient email — the intended recipient. When set, Ananda sends a "gift card received" email to this address with the code and instructions.
- ▸ Status — active (has remaining balance), redeemed (balance is zero), or expired.
The redemption flow:
- 1 Someone purchases a gift card at your studio (or you create one manually as admin).
- 2 The recipient receives the code by email (if recipient_email is set) or the purchaser shares it directly.
- 3 At checkout, the recipient enters the gift card code. The balance is applied to the purchase total.
- 4 If the gift card covers the full amount, no additional payment is needed. If the balance is less than the purchase, the student pays the difference with another payment method.
-
5
The remaining balance is updated. The gift card discount is recorded on the student's package as
gift_card_discount_cents.
Frequently asked questions
Can a gift card be used across multiple purchases? ▾
Can I use a promo code and a gift card together? ▾
How do I track promo code performance? ▾
Student Profiles
Every student who registers at your studio has a profile in your Students section. This is your CRM — use it to understand your students, track their activity, and communicate effectively.

What a student profile contains
- ▸ Contact details — name, email, phone number, and address. The email is used for all communications and as their login.
- ▸ Emergency contact — name and phone number of their emergency contact person.
- ▸ Booking history — full list of past and upcoming bookings with status (confirmed, attended, cancelled, no-show).
- ▸ Package history — all packages purchased (current and past), with remaining credits, expiry dates, and payment details.
- ▸ Attendance stats — total classes attended, helping you identify your most active students.
- ▸ Lifetime value — total amount spent at your studio across all purchases.
- ▸ Intake form answers — responses to any intake questions they have answered (see Intake Forms).
Student notes
You can add notes to any student profile to record important information. Notes are not visible to the student — they are internal to your team. There are two types:
Private notes
Visible only to owners and admins. Use these for sensitive information: payment issues, special arrangements, complaints, or anything you do not want teachers to see.
Example: "Requested monthly payment plan — approved by Sarah on March 1."
Teacher notes
Visible to teachers (and admins/owners). Use these for information relevant to class instruction: injuries, physical limitations, modifications needed, preferences.
Example: "Knee injury — avoid deep squats and lunges. Modified standing poses OK."
Each note records who wrote it and when, so you can track the conversation history. Notes have a maximum length of 5,000 characters.
How students register
Students can register at your studio page using:
- ▸ Email and password — standard sign-up form. The student enters their name, email, and a password.
- ▸ Google sign-in — one-click registration and login with their Google account. Their Google profile picture is used as their avatar automatically.
Adding a student manually
Studio admins with the Manage students permission can add students directly from the dashboard without waiting for them to self-register. Go to Students -> New Student and enter their first name, last name, and email address.
If the email already belongs to an existing Ananda user, they are linked to your studio. Otherwise a new account is created. After creation you are taken straight to their profile page. The student receives an invitation email to set up their password.
Editing student profiles
Admins with the Manage students permission can edit any student's profile. Open the student's profile page and click Edit to update personal information, emergency contact, address, and other details. This is useful for correcting data entered incorrectly, or for adding information on behalf of a student.
Frequently asked questions
Can students see notes written about them? ▾
Can I import students from a spreadsheet? ▾
What happens if I remove a student from my studio? ▾
Intake Forms & Waivers
Collect important information from your students before they attend class. Ananda supports two complementary systems: studio-wide waivers (legal documents every student must accept) and per-class intake questions (specific questions tied to individual classes).
Studio-wide waivers
Under Settings -> Legal, you can add a liability waiver and terms of service for your studio. Students see these terms as a checkbox during checkout — they must tick "I accept the terms" before completing their first booking.
You can write the waiver text directly in the editor (markdown is supported) or paste your existing document. This protects your studio legally and sets clear expectations from the start.
Per-class intake questions
You can create intake questions and assign them to specific class definitions. Students answer these questions when they book that class. Go to Settings -> Intake Forms to create and manage questions.
Creating an intake question:
- ▸ Question text (required) — the question as the student will see it. Be clear and specific.
- ▸ Answer type (required) — choose one of four types:
| Type | What the student sees | Example |
|---|---|---|
| Free text | A text input field | "Do you have any injuries we should know about?" |
| Yes / No | Two radio buttons | "Is this your first yoga class?" |
| Multiple choice | Radio buttons from your custom options | "Experience level: Beginner / Intermediate / Advanced" |
| Terms acceptance | A checkbox to accept terms | "I understand this is an advanced class and..." |
- ▸ Options — for multiple choice questions, provide the list of answer choices. At least one option is required.
- ▸ Required — when enabled, the student cannot complete their booking without answering this question.
- ▸ Position — controls the display order when multiple questions are assigned to the same class.
Assigning questions to classes
After creating intake questions, assign them to specific class definitions. The same question can be assigned to multiple classes. When a student books a class that has intake questions, they are presented with the questions during the booking flow.
Answers are stored on the student's profile and visible to teachers and admins. Each answer is linked to both the student and the class definition, so you can see exactly what each student said for each class. If the student books the same class again, their previous answers are pre-filled for convenience.
Frequently asked questions
Do students have to answer intake questions every time they book? ▾
Can teachers see intake answers? ▾
Staff Roles & Permissions
Every person connected to your studio has a role that controls what they can see and do. Ananda uses role-based access control (RBAC) with five distinct roles, each designed for a different function in your studio.
The five roles
Owner
Full access to everything, including billing, subscription management, and staff management. There is exactly one Owner per studio — the person who created the account.
Admin
Broad access — everything the Owner can do except manage staff and billing. Ideal for studio managers who handle day-to-day operations.
Teacher
Focused on the schedule and classes. Can view the schedule, manage their own classes, check in students, and view reports. Cannot access student profiles, payments, or settings.
Front Desk
Day-to-day reception operations. Can check in students and make bookings on their behalf. Cannot access schedules, payments, reports, or settings.
Student
The default role for every person who registers. Can book classes, view their own bookings, manage their packages, and access their profile.
Permission matrix
This table shows the default permissions for each staff role:
| Permission | Owner | Admin | Teacher | Front Desk |
|---|---|---|---|---|
| Manage billing & subscription | ✓ | ✕ | ✕ | ✕ |
| Manage staff (invite/remove) | ✓ | ✕ | ✕ | ✕ |
| Manage settings | ✓ | ✓ | ✕ | ✕ |
| Confirm payments | ✓ | ✓ | ✕ | ✕ |
| Manage packages & pricing | ✓ | ✓ | ✕ | ✕ |
| Manage students | ✓ | ✓ | ✕ | ✕ |
| Manage schedule & classes | ✓ | ✓ | ✓ | ✕ |
| View reports | ✓ | ✓ | ✓ | ✕ |
| Check in students | ✓ | ✓ | ✓ | ✓ |
| Book classes (on behalf of students) | ✓ | ✓ | ✕ | ✓ |
Custom permissions
The Owner can customise any staff member's permissions beyond their role's defaults. For example, you might give a teacher the ability to book classes on behalf of students, or give a front desk person the ability to confirm payments. Custom permissions are set per user and override the role's defaults entirely.
To customise permissions, go to Settings -> Team, find the staff member, and click Edit Permissions.
Staff account statuses
Each team member has a status that controls their access:
- ▸ Active — the user can access the studio dashboard and perform actions according to their role.
- ▸ Inactive — the user's access is temporarily disabled. Use this for staff on leave.
- ▸ Suspended — the user's access is revoked. Use this to permanently block access without deleting the record.
Inviting Staff
Inviting a new team member
Only the studio Owner can invite staff members. Here is the step-by-step process:
- 1 Go to Settings -> Team and click Invite team member.
- 2 Enter their first name, last name, and email address.
- 3 Choose their role: Admin, Teacher, or Front Desk.
- 4 Optionally customise their permissions before sending.
- 5 Click Send Invitation. The person receives an email with a link.
- 6 When they click the link, they are added to your studio and redirected to the dashboard.
Removing a staff member
Go to Settings -> Team, find the person, and click the options menu -> Remove from studio. Their access is revoked immediately. Historical records (classes taught, check-ins, etc.) are preserved for reporting.
What teachers see
When a teacher logs in, they see a streamlined dashboard focused on their teaching responsibilities:
- ▸ Their upcoming classes with booking counts and student lists
- ▸ The studio schedule (view and manage classes)
- ▸ Check-in functionality for marking attendance
- ▸ Reports relevant to their classes
- ▸ Teacher notes on student profiles (but not private/admin notes)
Frequently asked questions
Can I have multiple admins? ▾
Can a person be both a teacher and an admin? ▾
Emails & Notifications
Ananda sends automated emails to students and studio admins at key moments throughout the studio lifecycle. All emails are sent from Ananda on your studio's behalf, with your studio name in the sender field.
All email template types
Ananda has 17 email template types. Each serves a specific purpose and is triggered automatically:
Booking & class emails
| Template | When it is sent | Sent to |
|---|---|---|
| Booking confirmation | Immediately when a student books a class | Student |
| Class reminder | Before the class start time (configurable) | Student |
| Cancellation | When a booking is cancelled (by student or admin) | Student |
| Event booking confirmation | When an event ticket is booked | Student |
| Class cancelled notification | When a class occurrence is cancelled by admin | All booked students |
| Class updated notification | When class time or teacher changes on a booked occurrence | All booked students |
| Class feedback request | After a student attends a class | Student |
Package & payment emails
| Template | When it is sent | Sent to |
|---|---|---|
| Expiration warning | When a class pass is approaching its expiry date | Student |
| Payment failed | When a recurring membership charge fails | Student |
| Gift card received | When someone purchases a gift card with a recipient email | Recipient |
Engagement & retention emails
| Template | When it is sent | Sent to |
|---|---|---|
| Welcome | When a new student registers at your studio | Student |
| Welcome series (day 3) | 3 days after registration | Student |
| Welcome series (day 7) | 7 days after registration | Student |
| No-show follow-up | After a student is marked as no-show | Student |
| Re-engagement | When a student has been inactive for 30+ days | Student |
| Student milestone | When a student reaches class milestones (e.g. 10th, 50th, 100th class) | Student |
| Custom | Sent manually by admin for any purpose | Selected students |
Customising email templates
On the Scale plan, go to Settings -> Emails to customise the subject and HTML body of each email template. Each template has:
- ▸ Subject — the email subject line. Supports variable interpolation.
- ▸ Body (HTML) — the full HTML content of the email. Write your own copy and styling.
- ▸ Locale — templates can be created per language (English and Italian). The student receives the email in their preferred language.
- ▸ Enabled toggle — disable a template to stop that email type from being sent. Useful if you do not want to send no-show follow-ups, for example.
Frequently asked questions
Can I disable specific email types? ▾
What is the welcome series? ▾
How does the re-engagement email work? ▾
Support Tickets
Ananda includes a built-in support ticket system that works in two directions: students can submit tickets to your studio team, and studio owners can submit tickets to the Ananda platform team.
Student tickets (student -> studio)
Students can contact your studio by opening a support ticket from their account area. They submit a subject, a description, and an optional screenshot attachment.
What a ticket contains:
- ▸ Subject — a short description of the issue (max 200 characters).
- ▸ Description — detailed explanation of the problem or question.
- ▸ Screenshot — optional image attachment to help explain the issue.
- ▸ Priority — low, normal, high, or urgent. Helps your team triage effectively.
- ▸ Status — open -> in progress -> resolved -> closed. Use the quick action buttons to move tickets through the lifecycle.
Managing incoming tickets
Go to Support in your studio dashboard. Tickets are listed with their status and can be filtered by open, in-progress, resolved, and closed states. Open tickets are highlighted with a banner on your dashboard so they do not get missed.
- ▸ Reply — type a message in the ticket thread to respond to the student. Both parties receive email notifications on each reply. Replies can include screenshot attachments.
- ▸ Internal notes — add private notes visible only to your studio staff, not to the student. Useful for coordinating with your team before responding.
- ▸ Assign — assign the ticket to a specific staff member for follow-up.
- ▸ Status actions — use the Resolve, Close, and Reopen buttons to manage the ticket lifecycle. Resolved and closed tickets are dimmed in the list to keep your queue clean.
GDPR data requests
The ticket system also supports GDPR data requests. Students can submit requests for data access, data portability, correction, deletion, or objection. These are tracked with a specific request type so you can handle them in compliance with data protection regulations.
Platform support (studio owner -> Ananda)
Studio owners can submit tickets directly to the Ananda platform team for platform-level issues, billing questions, or feature requests. Go to Support -> Contact Ananda to open a ticket. These are marked as platform tickets and are handled by the Ananda team. The same thread-based conversation applies — you receive email notifications when the team replies.
Video on Demand
Video on Demand (VOD) lets you build a library of pre-recorded content for your students to watch at any time — recorded classes, tutorials, meditation guides, and more. Go to Videos in your dashboard to manage your video library.
Adding videos
Each video in your library has the following fields:
- ▸ Title (required) — the name of the video as students will see it.
- ▸ Description — what the video covers, who it is for, and what level.
- ▸ Video URL — the link to the video file. Videos are hosted externally (e.g. Vimeo, YouTube, or your own hosting). Ananda embeds the video for playback.
- ▸ Thumbnail — a preview image shown in the video library. Upload a representative frame or promotional image.
- ▸ Duration — the video length in seconds. Displayed as a formatted time (e.g. "45 min") to students.
- ▸ Teacher — the teacher who leads the video. Shown alongside the video title.
- ▸ View count — tracked automatically. Shows how many times the video has been watched.
Access control
Each video has an access type that controls who can watch it:
| Access type | Who can watch | Best for |
|---|---|---|
| Free | All registered students | Teasers, introductory content, community classes |
| Subscription | Students with an active membership or pass that includes video access | Premium content bundled with memberships |
| Purchase | Students who have purchased a specific package that includes this video | Standalone video courses sold separately |
Playlists
Organise your videos into playlists — themed collections that make it easier for students to find related content and follow a structured learning path.
- ▸ Title — the playlist name (e.g. "Beginner Yoga Series", "Morning Flow Collection").
- ▸ Description — what the playlist covers and who it is for.
- ▸ Public toggle — controls whether students can see this playlist. Set to private to prepare a playlist before publishing.
- ▸ Video order — videos within a playlist are ordered by position. Drag to reorder them into the sequence you want students to follow.
A single video can belong to multiple playlists. This lets you reuse content across different collections without duplicating it.
Frequently asked questions
Where are videos hosted? ▾
Can I track which students watched a video? ▾
Reports & Analytics
Ananda gives you visibility into your studio's performance through a real-time dashboard and detailed reports. Use data to understand what is working, identify trends, and make informed business decisions.
Dashboard overview
Your studio dashboard is the first thing you see when you log in. It provides a real-time snapshot of your studio's activity:
- ▸ Key metrics — total students, active bookings, monthly revenue, and upcoming classes at a glance.
- ▸ 7-day schedule preview — all classes in the next week, so you can see your immediate workload.
- ▸ Pending payments — bank transfer and in-studio payments waiting for your confirmation.
- ▸ Recent activity feed — the last 10 actions across your studio: new bookings, cancellations, new students, payments processed.
- ▸ Recent bookings — a quick-access list of the latest bookings.
- ▸ Open support tickets — highlighted banner if you have unresolved student tickets.
Advanced reports
The Reports section gives you in-depth analytics about your studio's performance:
- ▸ Revenue reports — total revenue by period, payment method breakdown, average transaction value.
- ▸ Attendance reports — attendance trends over time, most popular classes, average class fill rate.
- ▸ Package sales — which pricing options sell best, conversion rates from trial to paid package.
- ▸ Student analytics — new registrations, retention rates, inactive students.
Date filters and CSV export
All reports support date range filtering — select a start and end date to focus on a specific period (this week, this month, last quarter, custom range). Reports can be exported to CSV for further analysis in spreadsheets or accounting software.
Frequently asked questions
Can teachers see reports? ▾
What reports are available on the free plan? ▾
Integrations
Connect Ananda to the tools you already use. All integrations are configured under Settings -> Integrations.
Zoom
When Zoom is connected, Ananda automatically creates a Zoom meeting for every online and hybrid class occurrence. Students receive a protected, personal join link in their booking confirmation and reminder emails — the link verifies their identity and cannot be shared.
Setup — step by step:
- 1 Go to Settings -> Integrations.
- 2 Click Connect Zoom.
- 3 You will be redirected to Zoom to authorise the connection. Ananda requests only the permissions it needs: creating and deleting meetings on your behalf.
- 4 Once authorised, Zoom meetings are created automatically for all online and hybrid class occurrences.
Manual meeting URL: If you use a different video platform (Google Meet, Teams, etc.) or prefer a fixed Zoom room, enter a meeting URL directly on any class occurrence. A manually entered URL takes precedence over an automatically created Zoom meeting.
What Ananda accesses: Only the meetings it creates. No recordings, contacts, or other Zoom data.
To disconnect: Go to Settings -> Integrations -> Disconnect Zoom. Access is revoked immediately.
Mailchimp
Connect Mailchimp to sync your student list with your Mailchimp audience. This lets you use Mailchimp's email marketing tools to send newsletters, promotions, and announcements to your students.
Setup:
- 1 Go to Settings -> Integrations.
- 2 Enter your Mailchimp API key (found in your Mailchimp account under Account -> Extras -> API keys).
- 3 Select the Mailchimp audience (list) to sync with.
How the sync works: When a new student registers at your studio, their name and email are automatically added to your selected Mailchimp audience. You can then use Mailchimp's campaign tools to send them marketing emails, segment them by engagement, and build automated flows.
Stripe
Stripe is Ananda's primary payment processor for card payments and recurring memberships. See the Payment Methods section for detailed setup instructions.
AI chat assistant
On the Scale plan, an AI assistant chat widget appears on your studio's public pages. Students can ask questions about your classes, pricing, schedule, and studio policies and get instant, accurate answers — without you needing to be available. The AI is trained on your studio's data (classes, pricing, schedule) so its answers are specific to your studio.
Frequently asked questions
Can I use Google Meet or Teams instead of Zoom? ▾
Does Mailchimp sync both ways? ▾
Plans & Pricing
Ananda offers three plans designed to scale with your studio. All new studios start with a 14-day free trial that includes all Grow features — waitlist, promo codes, gift cards, advanced reporting, and all payment methods — so you can explore the platform fully before committing.
Starter
Free
Everything you need to get started:
- ✓ Unlimited group classes
- ✓ Student bookings
- ✓ Stripe card payments
- ✓ Events & ticket types
- ✓ Intake forms & waivers
- ✓ Student profiles & notes
- ✓ Public studio profile
- ✓ Dashboard with key metrics
Grow
EUR 19/month
Everything in Starter, plus:
- ✓ PayPal payments
- ✓ Bank transfer & in-studio payments
- ✓ Private & workshop classes
- ✓ Recurring memberships
- ✓ Waitlist
- ✓ Promo codes & gift cards
- ✓ Zoom integration
- ✓ Lower platform fee on Stripe
Scale
EUR 39/month
Everything in Grow, plus:
- ✓ Custom email templates
- ✓ Video on Demand
- ✓ Team management (staff roles)
- ✓ Mailchimp integration
- ✓ Advanced reports & CSV export
- ✓ AI chat assistant
- ✓ Lowest platform fee on Stripe
Feature comparison
| Feature | Starter (Free) | Grow (EUR 19/mo) | Scale (EUR 39/mo) |
|---|---|---|---|
| Group classes | ✓ | ✓ | ✓ |
| Private & workshop classes | ✕ | ✓ | ✓ |
| Student bookings | ✓ | ✓ | ✓ |
| Stripe card payments | ✓ | ✓ | ✓ |
| PayPal, bank transfer, in-studio | ✕ | ✓ | ✓ |
| Recurring memberships | ✕ | ✓ | ✓ |
| Waitlist | ✕ | ✓ | ✓ |
| Promo codes & gift cards | ✕ | ✓ | ✓ |
| Events & ticket types | ✓ | ✓ | ✓ |
| Intake forms & waivers | ✓ | ✓ | ✓ |
| Student profiles & notes | ✓ | ✓ | ✓ |
| Support tickets | ✓ | ✓ | ✓ |
| Zoom integration | ✕ | ✓ | ✓ |
| Custom email templates | ✕ | ✕ | ✓ |
| Video on Demand | ✕ | ✕ | ✓ |
| Team management | ✕ | ✕ | ✓ |
| Mailchimp integration | ✕ | ✕ | ✓ |
| Advanced reports & CSV export | ✕ | ✕ | ✓ |
| AI chat assistant | ✕ | ✕ | ✓ |
Managing your plan
Upgrade or change your plan at any time from Settings -> Subscription. You can pay monthly or annually (annual billing offers a discount). Changes take effect immediately — if you upgrade, you get instant access to the new features.
What happens when the trial ends
When your 14-day trial expires, your account moves to the Starter plan automatically. Features that require Grow or Scale (such as PayPal, waitlist, advanced reports) will be locked until you upgrade.
- ▸ Your data is always preserved — no classes, bookings, or student information is lost.
- ▸ There is a 7-day grace period after the trial ends during which you can still access your studio fully.
- ▸ After the grace period, studio access is suspended until you choose a plan.